Helpful Links for your GPS Platform
This page was created to help customers find their way through the multitude of options available to them when navigating their GPS TRACKING Platform.
We have attempted to make each item as detailed as possible but if you still get lost or are not sure, Simply call GPS TRACKING CENTRE at [604] 318-8545 and ask for help.
The Basic How To List:
1- Reports- simple and easy. All data is stored for 1 year
2- SETTING UP ALERTS- BASIC- The BASIC way to start setting up Alerts
3- Send your alert to your phone
4- Your unit name needs an update- How to Change that name
5 – How to Track Back on your PC / IOS platform
———————————————————————–
#1: Report- Simple and easy. Reports: How to view and download.
- On your platform page, if you look at the Navigation bar, you will see Reports.
- Click on Reports.
- Now we will choose the type of report you want by clicking on the down arrow to the right of CHART REPORTS.
- The most common and detailed type of report is DETAILED REPORT.
- Next, look to the right and you will see a time frame window. (Date Range).
- Choose the date or range you would like to retrieve. There is a drop down window that will provide Multiple options.
- Now that you have chosen the REPORT TYPE and the DATE RANGE– click on GENERATE REPORT.
To this point, you will have in front of you, a detailed or specific report based on your request. Please keep in mind that reports are available going back 1 year.
What if you wish to download and save the report?
That can be done also and it is quite simple.
With your report still open in front of you, look to the far right portion of the screen. You will see
- Scheduled Report(s) – Scheduled Report Settings – and – DOWNLOAD
- In the DOWNLOAD window, choose the format you would like. – PDF or xl
- On the bottom left part of your screen, you will see a window that opened that says MY REPORTS.
- Your current and past downloaded reports will be listed in this window.
- Double click the report you want to save.
- It will open- Now simply complete a SAVE AS instruction on your computer and save the file wherever you wish.
You can also use the SCHEDULED REPORT SETTINGS window to automatically retrieve and download reports based on the settings you input.
#2: SETTING UP ALERTS- BASIC- The BASIC way to start setting up Alerts
Alerts are the VERY IMPORTANT for the Security of your Assets.
They can be set to notify you on your Computer Screen / Platform or by APP to your SmartPhone
There are many types of Alerts – Which one(s) you use will be dependent on the HARDWARE in use.
Generally, use the following:
- On your platform (not from a SmartPhone) in the upper right- CLICK ON SETTINGS
- On the left panel – Click Notifications
- Centre Screen – Click- ALERTS
- Click – ADD NEW
- Choose your unit
For your First Alert – Choose Event 1. This will provide a list if Alerts. Not all are applicable to your Hardware.
- Choose the Applicable Alert that you would like for this unit.
- If you are not sure if it is applicable – give us a call and ask- We are here to help – Seven days per week
For this brief Tutorial, we will choose MOVING
- Now, at the top, in the NAME field- type your unit name/ number and MOVING
- At the bottom the page in Comments- Type- the unit name and IS MOVING
- Now we will choose the time frame that we wanted to be informed that the unit is moving- Use the days and times table (centre screen) and check the boxes you want to be Alerted. This can always be modified later by conducting an EDIT followed by SAVE.
- Next- How do you want to receive your Alert. (Notification Type) We suggest using one or more of the MULTI- Functions types. If you are including Email, be sure the email address is on your SmartPhone (gmail is best).
- If you choose SCREEN POP UP and E-MAIL, an email field will pop up – Fill that in
- If you choose EMAIL and SmartPhone, the email and SmartPhone fields will pop up – Fill them in
- Check the box – Click here to select basic notification and then Save
This will take you back to the ALERT list page where you will see which alerts are active.
To Edit any Alert, simply choose which one and click EDIT. Be sure to save your edit version
NOTE: Alerts to a SmartPhone are no longer handled by SMS message. Download our new APP and set them through the APP.
Go to : http://www.gpstrackingmanual.com/complete-manual/app/ and after choosing your OPERATING SYSTEM, follow the instructions.
Need more help? Just give us a call.
———————————————————————————————————————————————————————————————-
#3: Send your alert to your phone
First – read the SETTING UP ALERTS ( above)
Be sure you have downloaded and set up the APP ( AGAIN- SEE ABOVE)
When you are setting up your alters ( settings- notifications- add new – etc etc – in the ALERT NOTIFICATION TYPE ( drop down menu) be sure to check the SMARTPHONE box.
 ———————————————————————————————————————————————————————————————
#4: How to Change your Unit name or ICON: This is broken down into two parts – CHANGE ICONS and / or NAME
ICON:
- On your PLATFORM page- in the upper right area, go to SETTINGS. Now click on UNITS.
- You will notice that the default (plain jane style) icon is in place for your vehicles.
- If you would like to change the ICON- in the ICON column, beside the vehicle of choice, click on CHANGE. This will provide you multiple options to choose from. Choose the Icon you want to change to and then “OK”
Name change:
- In the same screen, you will notice a column labeled Vehicle Name.
- For the vehicle you want to change the name, Double Click on the right side of the current name. This will allow you to use the BACK SPACE key to back out the current name and then type in a new one.
- Once completed, click on any empty space on the page to complete the change.
- Now go back to the MAP. Locate the new name and initiate a GET CURRENT STATUS update. This is especially important if the GPS unit was just installed.
Still not sure- Just give us a call or send an e-mail with your request.
———————————————————————————————————————————————————————————————
#5: How TO TRACK BACK:
See the route and stops of the past.
This OPTION is very handy if you want to visually see and map put the route an asset travelled in a particular time line.
When it compiles the data (route) on the map, you also get a update list to the left that shows events logged from the GPS. (aka – specific report for that time line)
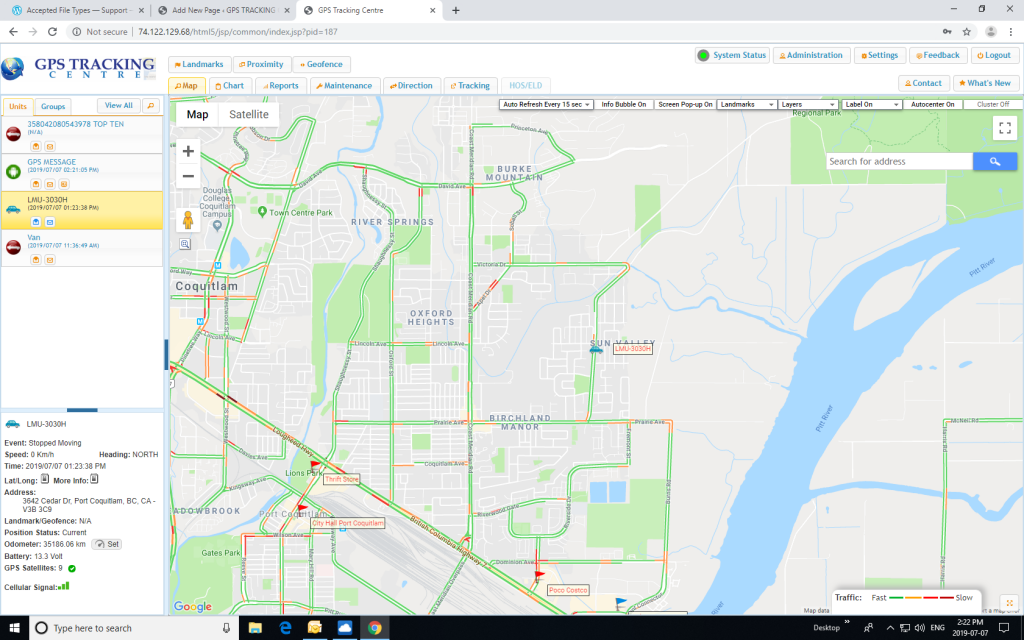
- Open the login on your DESKTOP (not your phone or in the app)
- In the navigation bar of the platform, you will see Tracking. (see below)- CLICK Tracking

Now, look to the bottom right of the screen. You will see this screen
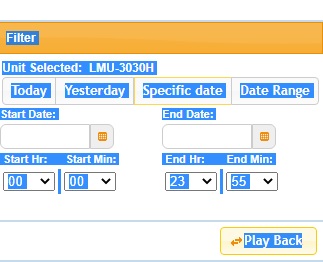
- Before you click on PLAY BACK, Choose the UNIT from your UNIT list (see 1st screen above) if you have more than 1.
- If you have just 1, you can skip this step and choose your time period. Now hit PLAY BACK and you get this.
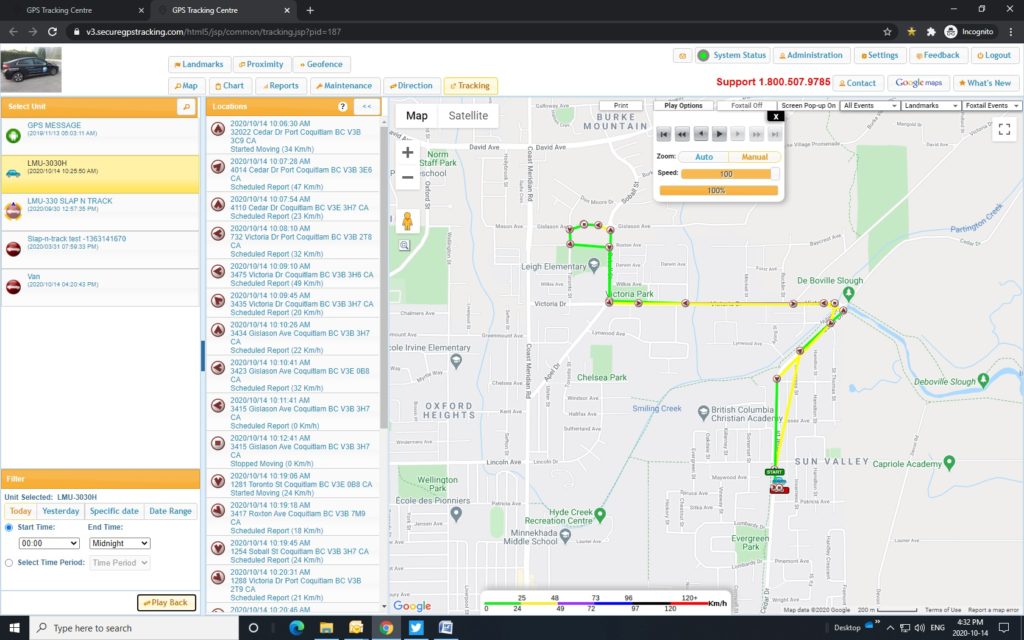
- Notice you have the start (green) and end (red) or actually they are START and STOP markers but to the left of the map you have all the data for that period also.
———————————————————————————————————————————————————————————————-